REQUIREMENT
admin.jmx
|
REQUIREMENT admin.jmx |
| Type | NEW |
| Priority | MEDIUM |
| Status | CLOSED |
| Topic | XmlBlaster provides an JMX-Interface for monitoring and controlling | ||||||||||||||||||||||||||||||||||||||||||||||||||||||||||||||||||||||||||||||||||||||||||
|
Des cription |
JMX overview
JMX-support
(Java Management Extension) is available for xmlBlaster. What is JMX?
JMX is a Sun standard that allows Java developers to rapidly management
functionality into existing applications. 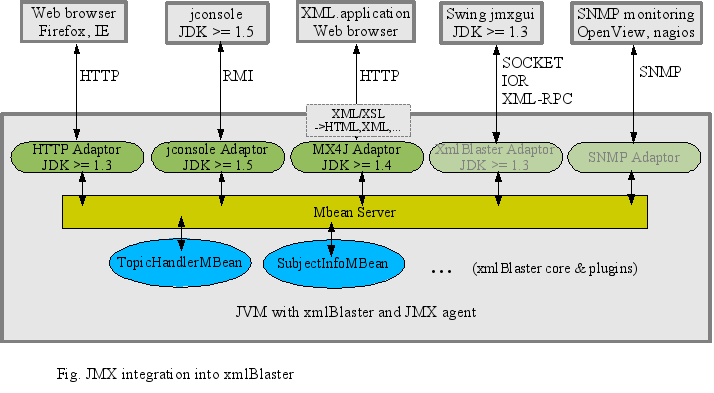
JMX adaptor overviewXmlBlaster provides internal informations using MBean as specified by the JMX specification. To access those MBeans there are several adaptors available:
Changing properties using JMXImportant note: When changing properties with JMX you need to be aware what you are doing. Not all configurations over JMX have been tested. It is best that you check any manipulation first on your reference system. |
||||||||||||||||||||||||||||||||||||||||||||||||||||||||||||||||||||||||||||||||||||||||||
|
Example any |
Observing xmlBlaster with a browserOn startup of xmlBlaster you need to switch this adaptor on: java org.xmlBlaster.Main -xmlBlaster/jmx/HtmlAdaptor true Open URL http://localhost:8082 in your browser. This adaptor does not support changing of property names containing '[' or ']' as it interprets those as an array. A smart work around is currently not known. Caution: You should protect remote access of xmlBlaster using the html adaptor with a login name and password, see the configuration section below how to do it, here is an example (type all in one line):
java org.xmlBlaster.Main -xmlBlaster/jmx/HtmlAdaptor true
                         -xmlBlaster/jmx/HtmlAdaptor/loginName admin
                         -xmlBlaster/jmx/HtmlAdaptor/password secret

Open URL
   http://localhost:8082
in your browser and type in the above credentials.
Note: You need the jmxtools.jar file in your CLASSPATH which is
there if you use the xmlBlaster.jar as downloaded. HTML adaptor screenshot
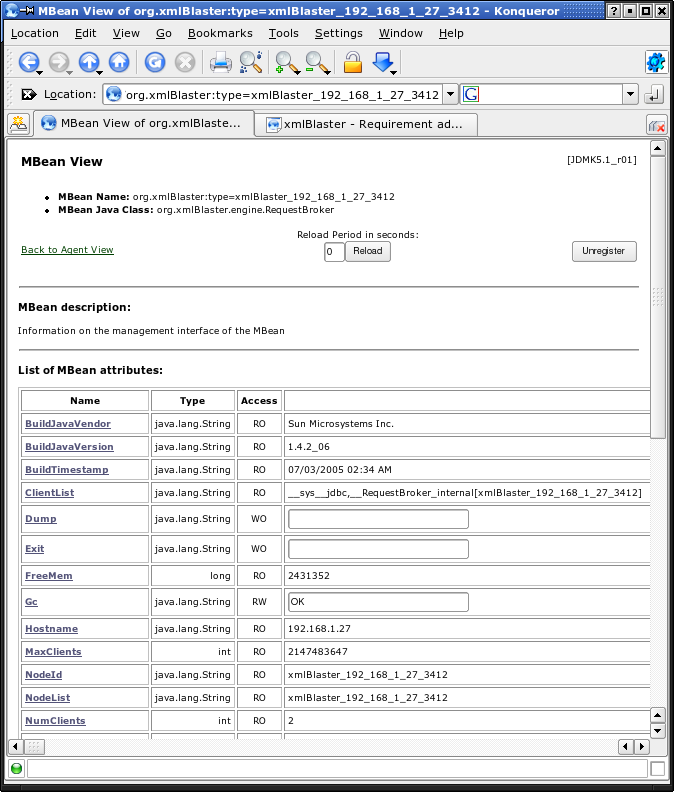 |
||||||||||||||||||||||||||||||||||||||||||||||||||||||||||||||||||||||||||||||||||||||||||
|
Example any |
Observing xmlBlaster with jconsole# Start the server java -Dcom.sun.management.jmxremote org.xmlBlaster.Main # Start the GUI: jconsole You find the jconsole application in the JAVA_HOME\bin directory of JDK 1.5 or above. Start jconsole as the same user and on the same computer as the server. In the MBeans tab of jconsole you find the org.xmlBlaster root node. Remote accessFor remote access try these settings, take care, in this setup you have no access control and anybody could log in:
# Start the server
java -Dcom.sun.management.jmxremote.port=1099
     -Dcom.sun.management.jmxremote.ssl=false
     -Dcom.sun.management.jmxremote.authenticate=false org.xmlBlaster.Main

# Start the GUI:
jconsole service:jmx:rmi:///jndi/rmi://localhost:1099/jmxrmi
Please replace localhost in the above example with your computer DNS name or IP address. Note that on Linux the command 'hostname -i' must return the remote IP address (adjust /etc/hostname). Simple password protectionNow we add simple password protection, first we create a password file called jmxremote.password with clear text password secret and one read only and one administrative user: # jmxremote.password # Set permissions to be readable by xmlBlaster user only: # Unix: # chmod 600 jmxremote.password # Windows NTFS: # cacls jmxremote.password /P %USERNAME%:C monitorRole secret controlRole secret There is an example password file /opt/jdk1.5.0_04/jre/lib/management/jmxremote.password.template delivered with your JDK which contains some guidance.
# Start the server
java -Dcom.sun.management.jmxremote.port=1099
     -Dcom.sun.management.jmxremote.ssl=false
     -Dcom.sun.management.jmxremote.password.file=jmxremote.password
      org.xmlBlaster.Main

# Start the GUI (and enter user=controlRole, password=secret):
jconsole service:jmx:rmi:///jndi/rmi://localhost:1099/jmxrmi
Note: For remote access of xmlBlaster using jconsole with password or SSL protection please consult the jconsole online documentation and read the jconsole FAQ. Handcrafted JMX-RMI startupIf you don't have access to the JVM and can't set the system properties we provide a self-coded JMX-RMI adaptor startup possibility, here is an example:
java org.xmlBlaster.Main -xmlBlaster/jmx/rmi true
                         -xmlBlaster/jmx/rmi/user joe
                         -xmlBlaster/jmx/rmi/password secret

# Start the GUI (and enter user=joe, password=secret):
jconsole service:jmx:rmi:///jndi/rmi://localhost:1099/jmxrmi
Jconsole screenshot
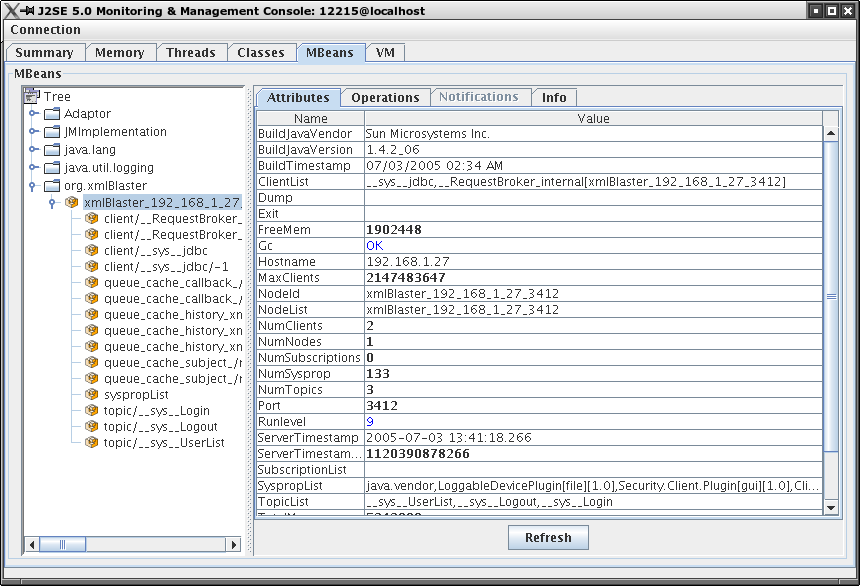 |
||||||||||||||||||||||||||||||||||||||||||||||||||||||||||||||||||||||||||||||||||||||||||
|
Example any |
Observing xmlBlaster with MC4J GUIThe MC4J sourceforge project offers an advanced Management Console, here is how to start it:
java -Dcom.sun.management.jmxremote
     -Dcom.sun.management.jmxremote.port=8999
     -Dcom.sun.management.jmxremote.ssl=false
     -Dcom.sun.management.jmxremote.authenticate=false org.xmlBlaster.Main

MC4J_Console_1.2b9   (start the GUI, choose 'Create Server Connection' -> 'J2SE 5.0')
Note: The above example is unprotected, you definitely need to configure SSL protection! MC4J screenshot
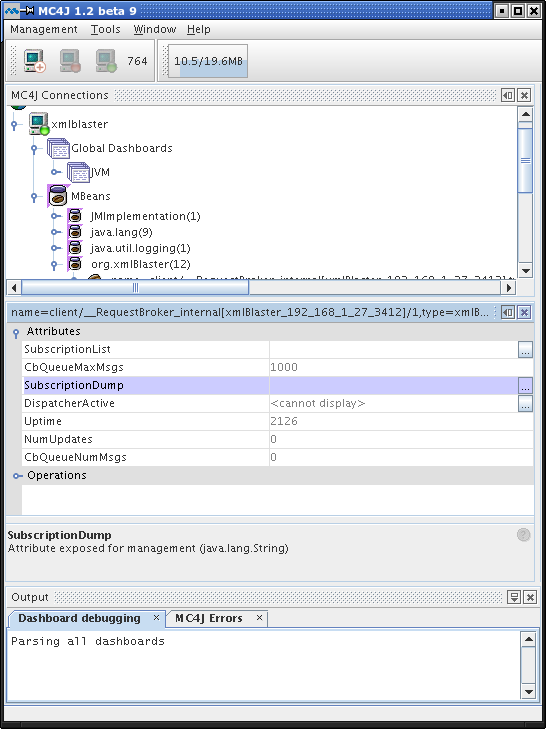 |
||||||||||||||||||||||||||||||||||||||||||||||||||||||||||||||||||||||||||||||||||||||||||
|
Example any |
Monitoring Specific Functionality with the MX4J PluginUncomment the plugin in xmlBlasterPlugins.xml to activate this adaptor.
      <plugin id='MX4JAdaptorPlugin' className='org.xmlBlaster.contrib.jmx.MX4JAdaptor'>
      <attribute id="xsltProcessor">XSLTProcessor</attribute>
      <attribute id="hostname">localhost</localhost>
      <attribute id="port">9999</attribute>
      <attribute id="adaptorName">HttpAdaptorMX4J</attribute>
      <attribute id="xsltPath">org/xmlBlaster/contrib/replication/monitor</attribute>
      <attribute  id="xsltCache">false</attribute>
      <attribute  id="defaultUrl">serverbydomain</attribute>

      <!-- <attribute id="xsltLocale"></attribute> -->
      <action do='LOAD' onStartupRunlevel='4' sequence='5' onFail='resource.configuration.pluginFailed'/>
      <action do='STOP' onShutdownRunlevel='3' sequence='65'/>
   </plugin>
Start the XmlBlaster. You also need to activate one JMX Connector, either the RMI or HTTP would do it:
 java -Dcom.sun.management.jmxremote org.xmlBlaster.Main
   or
 java org.xmlBlaster.Main -xmlBlaster/jmx/HtmlAdaptor true
   or
 java -Dcom.sun.management.jmxremote org.xmlBlaster.Main -xmlBlaster/jmx/HtmlAdaptor true
This example would start an instance of an http server listening on the localhost on port 9999. For each http request, MX4J generates an XML response. If you don't specify an xsltProcessor, for example if you comment out the line:
<!-- <attribute id="xsltProcessor">XSLTProcessor</attribute> -->
the adaptor will return the raw XML string. This is very useful under development to see how to write your own xsl stylesheets.
Urls to start with are (replace 'heron' in the examples with your cluster node id, here we have started xmlBlaster with -cluster.node.id heron):
All above queries return the 'raw' xml. A trailing '*' returns the complete hierarchy below, a named final name returns the flat object. A missing part in the upper hierarchy is interpreted as a '*' to get all the leaves. The next step is to apply a XSL stylesheet for nicer formatting, exampes are provided xmlBlaster/src/java/org/xmlBlaster/contrib/replication/monitor/*.xsl (serverbydomain.xsl is the entry point for others like destinationDetails.xsl). It is very helpful to have two plugins running, one for the raw xml output and the other to develop the xsl.
If you use the xsltProcessor but do not define your own stylesheets (here it would mean you erase the xsl in
${user.home}/xmlBlaster/src/java/org/xmlBlaster/contrib/replication/monitor, the default stylesheets of mx4j would be used.
Per default this request is processed by the own xslt processing. In our case we have specified an xsltProcessor, that
is we bypass the default behaviour. In other words we will process the generated xml by own xsl stylesheets. The location of these stylesheets
is defined by the parameter xsltPath. The searching mechanism for this path is different from the one provided by default by the
mx4j implementation. This plugin will search for the path in the CLASSPATH. If more than such path are found in the CLASSPATH are found,
then the first is taken and a warning is given once listing all other locations found.
For each request the processor must know which stylesheet to use. Per default, if you invoke an mbean request, it will use mbean.xsl, if you make a server request, it will use server.xsl. You can overwrite the default behaviour as we do by specifying an http attribute in the get request called template. If you pass template=destinationList, then the xslt processor will look for a file called destinationList.xsl. More information you will find on the http adaptor description for mx4j.
MX4J screenshot (replication example)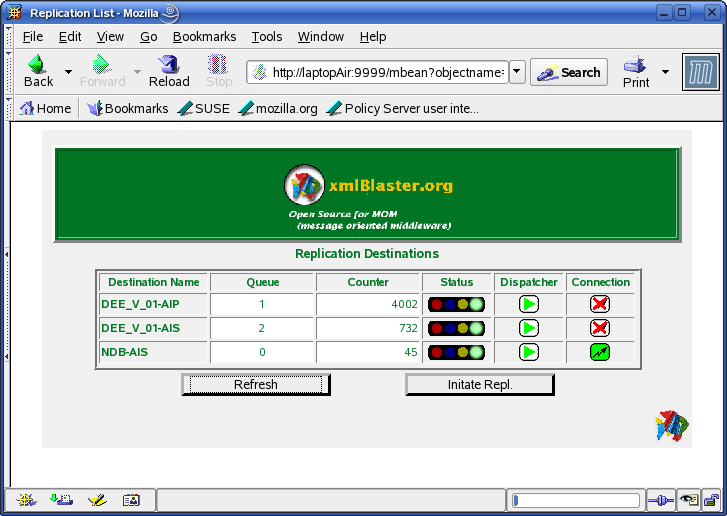 |
||||||||||||||||||||||||||||||||||||||||||||||||||||||||||||||||||||||||||||||||||||||||||
| Configure |
JMX is configured in the xmlBlaster.properties configuration file or on command line.
NOTE: Configuration parameters are specified on command line (-someValue 17) or in the
xmlBlaster.properties file (someValue=17). See requirement "util.property" for details. |
||||||||||||||||||||||||||||||||||||||||||||||||||||||||||||||||||||||||||||||||||||||||||
| Todo |
|
||||||||||||||||||||||||||||||||||||||||||||||||||||||||||||||||||||||||||||||||||||||||||
| See REQ | admin.commands | ||||||||||||||||||||||||||||||||||||||||||||||||||||||||||||||||||||||||||||||||||||||||||
| See REQ | admin.events | ||||||||||||||||||||||||||||||||||||||||||||||||||||||||||||||||||||||||||||||||||||||||||
| See API | Node specific usage details | ||||||||||||||||||||||||||||||||||||||||||||||||||||||||||||||||||||||||||||||||||||||||||
| See API | Subject specific usage details | ||||||||||||||||||||||||||||||||||||||||||||||||||||||||||||||||||||||||||||||||||||||||||
| See API | Session specific usage details | ||||||||||||||||||||||||||||||||||||||||||||||||||||||||||||||||||||||||||||||||||||||||||
| See API | Topic specific usage details | ||||||||||||||||||||||||||||||||||||||||||||||||||||||||||||||||||||||||||||||||||||||||||
| See API | Subscription specific usage details | ||||||||||||||||||||||||||||||||||||||||||||||||||||||||||||||||||||||||||||||||||||||||||
| See API | Queue specific usage details | ||||||||||||||||||||||||||||||||||||||||||||||||||||||||||||||||||||||||||||||||||||||||||
| See API | Storage specific usage details | ||||||||||||||||||||||||||||||||||||||||||||||||||||||||||||||||||||||||||||||||||||||||||
| See | JMX homepage | ||||||||||||||||||||||||||||||||||||||||||||||||||||||||||||||||||||||||||||||||||||||||||
| See | JMX guide | ||||||||||||||||||||||||||||||||||||||||||||||||||||||||||||||||||||||||||||||||||||||||||
| See | JMX tips | ||||||||||||||||||||||||||||||||||||||||||||||||||||||||||||||||||||||||||||||||||||||||||
| See | JMX tech-article | ||||||||||||||||||||||||||||||||||||||||||||||||||||||||||||||||||||||||||||||||||||||||||
| See | JMX Understand jconsole | ||||||||||||||||||||||||||||||||||||||||||||||||||||||||||||||||||||||||||||||||||||||||||
| See | MX4J Open Source implementation of JMX | ||||||||||||||||||||||||||||||||||||||||||||||||||||||||||||||||||||||||||||||||||||||||||
| See | JMDK homepage | ||||||||||||||||||||||||||||||||||||||||||||||||||||||||||||||||||||||||||||||||||||||||||
| See | MC4J homepage |
This page is generated from the requirement XML file xmlBlaster/doc/requirements/admin.jmx.xml