When the initial update is triggered for the very first time (that is for the first slave), the replication is started. At first a check is made to see if all DbResources are available. Resources which have not been loaded yet are loaded at this stage. This is the PL-SQL Code responsible for the synchronous part of the replication. For example functions and triggers are added. Tables, functions and triggers which are available already are not loaded twice. This ensures that no ongoing replication is disturbed by an initial update of another slave.
The configuration for the tables which have to be replicated is read and compared with the entries in the ${replication.prefix}tables . If there are differences these are corrected. For example if a new table is found which was not added to the ${replication.prefix}tables yet, it is added at this stage. On the other hand, if entries are not found in the configuration file, they are removed. The associated trigger is removed too.
If the replication source is running as a native client, the configuration is read from the xmlBlasterPlugins.xml configuration file, otherwise from the master's properties file passed on the command line of the ReplicationAgent. For example if you invoke:
java org.xmlBlaster.contrib.replication.ReplicationAgent -master master.properties -slave slave.properties
Then it is read from the file master.properties file. In both cases all property names with the prefix table. are read and processed. In the xmlBlasterPlugins.xml file it could look like:
  <plugin id='ReplNDBPlugin' className='org.xmlBlaster.contrib.dbwatcher.plugin.DbWatcherPlugin'>
    ...
    <attribute id='replication.prefix'>TEST</attribute>
    ...
    <attribute id='table.MYSCHEMA.TABLE1'>actions=IDU,trigger=TEST_TR01,sequence=3</attribute>
    <attribute id='table.MYSCHEMA.TABLE2'>actions=U</attribute>
    ...
  </plugin>
or in a property file:
          ... replication.prefix=TEST ...
          table.MYSCHEMA.TABLE1=actions=IDU,trigger=TEST_TR01,sequence=3
          table.MYSCHEMA.TABLE2=actions=U ...
The content of the properties is a comma separated list of key values. the key is separated from the value with an equality sign ('='). These list of parameters can be
Table 2.5. Content for table. properties
| Name | Mandatory | Default | Description |
|---|---|---|---|
| actions |

| IDU | These are the actions (or events) on which the trigger on the table will fire. I stands for insert, U for update and D for delete. If you choose here ID then it will only detect Inserts and Deletes, it will not detect any update. |
| trigger |
| Specifies the name to be assigned to the trigger. | |
| sequence |
| -1 | Sequence number by which the trigger is added when initializing. This value is replaced on first initialization to a sequence number gathered on the database. If you specify a negative value or nothing, then it will be loaded before any specified positive number. The sequence for properties having the same value are internally processed in a random sequence. Negative values will all be treated as -1, so internally they all will be treated in a random sequence. |
The following prerequisites must be fulfilled previously to trigger an initial update:
the XmlBlaster is running
the master of interest (DbWatcher) is currently running and reachable
the slave (DbWriter) has connected to the XmlBlaster
![[Note]](images/note.png) | Note |
|---|---|
It is not necessary that the DbWriter is currently online, it suffices that it has connected, i.e. it must have logged in once. |
![[Important]](images/important.png) | Important |
|---|---|
When connecting the DbWriter to the XmlBlaster you must specify that you want to use the DispatchPlugin[ReplManager][1.0] as a dispatcher plugin. |
The following image shows the initial update workflow graphically:
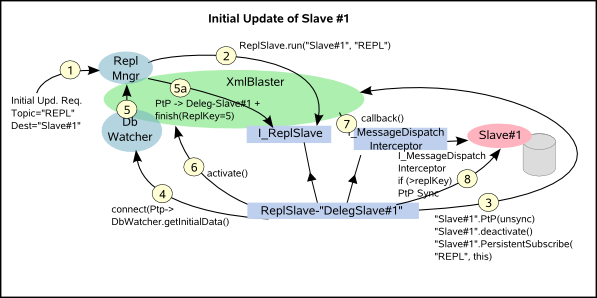
When the DbWriter connects to the XmlBlaster, the ReplManagerPlugin gets an event. If the connecting client is a replication slave, then it must have chosen the ReplManager as the dispatcher plugin. If this is the case, the ReplManagerPlugin creates a new instance of a proxy object: the ReplSlave. It is also registered in a map. It is however not initialized yet.
| Note |
|---|---|
The ReplManagerPlugin gets this event even when starting up the xmlBlaster if there are persistent connections. This way it is ensured that a slave is always represented server-side by a proxy even if it is currently off-line. |
Initial Update Request: The administrator does trigger an initial update request. This normally happens via the JMX Monitor specially designed for replication. Since the initial update establishes a marriage between a Master and a Slave you need to specify these: for the Master the replication.prefix and for the Slave the relative session name of the DbWriter.
Initializing the ReplSlave: The ReplManagerPlugin searches in its map for the given ReplSlave. When it is found it invokes the run method by passing the complete configuration of the DbWatcher. This way it does not need the information such as topic on which to subscribe since this information can be gathered from the DbWatcher's configuration. When initializing it subscribes to the relevant topic and passes the complete configuration of the DbWatcher as Client properties of the Subscription Qos. Since this is a persistent subscription, it is ensured that the ReplSlave will always know how to configure even after a server crash and even if the DbWatcher is not currently available.
Preparing the update: Once the slave is initialized the dispatcher, i.e. the framework taking care of delivering messages to the DbWriter, must be inhibited. This is to force queueing on the server side. This is needed to ensure the correct sequence of the messages to be delivered. Once delivery is inhibited, the content of the queue is completely cleared. Messages in the queue at this state are obsolete.
Requesting initial data: Everything is ready and the ReplSlave now makes a request to the newly married DbWatcher. He kindly ask the DbWatcher to send the initial data. This is done by publishing a ptp message directly sent to the DbWatcher of interest. The DbWatcher gathers this information. Several things happen here which are dependent on the configuration and on the database implementation. If it is the first update, triggers are added to the tables.
If an initial dump is requested, then it is sent directly to the DbWriter as high priority messages. Remember however that the dispatcher was temporary inhibited, which means such messages are collected and queued on the callback queue. Since they are high priority they will be the first to be delivered when the gate will be opened again.
Notifying about completion: Now the DbWatcher has done its hard work. It the time to notify the requesting part that it is OK to continue. This is done by sending a ptp message to the ReplManagerPlugin. The ReplManagerPlugin works as a dispatcher and forwards this information to the interested ReplSlave (5a).
Restarting delivery: The ReplSlave has now got the message, it knows also which is the replication key from the start and from the end of the initial update. So it basically knows if a replication change occurred during this time is obsolete or not. Having that information it is now ready to reopen the gate, that is to restart delivery of messages to the DbWatcher. This results in a status change which is visible on the monitor.
Delivery and check: Messages are now delivered and each one must be checked to see if it is obsolete. This check is also used to detect when the initial data have all been delivered. This information is then made available to the monitoring resulting in a status change.
Normal Operation: The last initial data has been delivered and the status has switched to normal operation. Messages are now delivered to the DbWriter and only a minor check of the messages is needed. Basically it is only checked if messages have already been delivered before.
In cases where it is not indicated to perform an initial update over the wire, for example in cases where the initial data is huge or the network connection slow, there is the option to transfer these data by means of files.
Per default this feature is switched off. To activate it you have to edit the customize.xsl file which resides in org/xmlBlaster/contrib/replication/monitor. You edit the line:
  <xsl:param name="show.initialFilesLocation" select="'no'"/>
  to be
  <xsl:param name="show.initialFilesLocation" select="'yes'"/>
| Note |
|---|---|
It is important to keep the single quote wrapping 'yes' or 'no' inside the double quote. Omitting these will fail to work. |
Once you have activated this field and restarted xmlBlaster you have one more field when choosing the initial update page looking like the following:
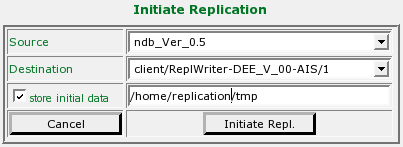
After having initiated the replication with the store initial data checkbox enabled, the initial workflow in the background is basically the same as for a normal initial update with some slight differences. All data is queued as usual, but:
all initial data chunk messages contain a property containing the location where to store such message
After the last chunk two additional end-of-initial-update messages are queued.
In the second phase of the initial update, i.e. when the dispatcher is enabled again for delivery to the slave, the property mentionned above is recognized and the message is not sent to the slave, instead it is written locally on disk at the location you specified.
The two end-of-update messages serve the following purpose: When the first is detected at the delivery step it is not delivered, instead the dispatcher closes again. At this time the first message in the queue will be the second end-of-update message.
The administrator now has to manually copy the files for example on a CD-ROM and deliver it to the slave. On the slave side it has to be copied from the CD-ROM to the location specified by the replication.initialFilesLocation property of the slave.
When the files are on location, the administrator simply activates the dispatcher for that particular slave again and the second end-of-update will be delivered to the slave. On the slave side, when this message arrives, it is detected. Thereby the slave knows it has to search for the messages on the file system and starts to load these files. When the process is successfully ended, the message is acknowledged and the initial update phase is completed.
If an error occurs, the message is not acknowledged, instead an exception is thrown back to the server, the dispatcher is closed again and the error message is visualized in the details pages of that particular slave.
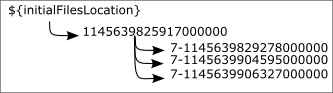
In a normal initial update, the initial data is transfered in chunks to avoid to exceed the maximum size allowed for example if the underlying communication protocol has some restrictions. When using the manual file transfer these chunks are written to file once they are coming in the destination queue. Each of these chunks is then a file on the filesystem. All these files are collected in a subdirectory. The name of the subdirectory is assigned each time an initial update is triggered and is ensured to be unique. In fact it is a unique timestamp.
The name of the chunks is constituted as ${prio}-${timestamp} where ${prio} is the priority of the message and ${timestamp} is the timestamp used to identify the entry in the queue. This way the messages are in the correct order when sorted alphabetically.
Use the JMX monitor and go to the initialUpdate page. Choose a source and a destination and additionally click the check box store initial data and specify the directory where you want to store your data.
Note The directory where you store your data must exist and it will reside on the machine where the xmlBlaster server is running. On this directory a subdirectory is created. Its name will be a unique timestamp. In that directory all chunks will reside as own files.
Once all entries have come in the queue they will automatically be written to the file system and removed from the queue. At this stage the dispatcher is disactivated and the status stays yellow. In the destinationDetails page (which you access by clicking on the destination name in the destinationList page), you will se in the last message text area the following text: Manual Data transfer: WAITING (stored on '${initialFilesLocation}')
Important If nothing happens here, i.e. if the entries are not written to the file system, verify that the slave is currently online. It must be online as long as the queue has to be flushed to the disk.
Go to the location ${initialFilesLocation}/${subdir} where the ${subdir} is the timestamp generated for this particular initial update. Verify also that this subdir is populated with files.
Copy the entire subdirectory with all its contents to a media of your choice. For example on a DVD or a CD-ROM.
Transport the media to its destination, i.e. the slave on which the data has to be installed.
Copy the subdirectory and all its contents to the directory ${initialFilesLocation}.
Note You have to verify what this location is by consulting the configuration for this particular slave because it could be configured differently than the master.
In the JMX Monitor reactivate the dispatcher for this slave. At this stage a message is sent to the slave. On receiving this message the slave reads the stored files with the initial data. The data is written to the DB and when this process is finished the message is acknowledged and the status turns green, meaning it is now ready and fully online.