Table of Contents
There are several different ways to monitor the replication, however there is a monitoring which has been specifically designed for the replication. That's our MX4JAdaptor which invokes a set of xsl stylesheets which make the necessary customization for the replication.
We have a jmx plugin making use of the mx4j http adaptor.
The configuration of the MX4JAdaptorPlugin is done as for the other xmlBlaster plugins in the xmlBlasterPlugins.xml configuration file. The following is an example of such a configuration. The files used for the xsl transformation reside in the directory: ${XMLBLASTER}/src/java/org/xmlBlaster/contrib/replication/monitor.
   <plugin id='MX4JAdaptorPlugin' className='org.xmlBlaster.contrib.jmx.MX4JAdaptor'>
      <attribute id="xsltProcessor">XSLTProcessor</attribute>
      <attribute id="host">localhost</attribute>
      <attribute id="port">9999</attribute>
      <attribute id="adaptorName">HttpAdaptorMX4J</attribute>
      <attribute id="xsltPath">org/xmlBlaster/contrib/replication/monitor</attribute>
      <attribute id="xsltCache">false</attribute>
      <attribute id="authenticationMethod">basic</attribute>
      <attribute id="replication.monitor.user.mike">usrPwd:user</attribute>
      <attribute id="replication.monitor.user.james">initPwd:initiator</attribute>
      <attribute id="replication.monitor.user.fred">adminPwd:admin</attribute>
      <action do='LOAD' onStartupRunlevel='4' sequence='4' onFail='resource.configuration.pluginFailed'/>
      <action do='STOP' onShutdownRunlevel='3' sequence='66'/>
   </plugin>
Table 3.1. The Items table
| Attribute | Default | Description |
|---|---|---|
| xsltProcessor | null | Normally you need to pass XSLTProcessor here since you want to process the generated xml by our special set of xsl files. For debugging purposes however you can pass null here, in which case the http requests will return the raw xml string. |
| host | 0.0.0.0 | This is the name or ip address of the host. If you pass the default 0.0.0.0 the embedded http server will be listening to all local interfaces. |
| port | 9999 | This is the port number on which the embedded http server listens for requests. |
| adaptorName | HttpAdaptorMX4J | This is the JMX node Name to give to this adaptor. Note that this must be unique which means that if you want to have several plugins you need to have for each a different name. |
| xsltPath | null | You must fill this value otherwise it will not find your xsl stylesheets. The path you specify will be searched in the CLASSPATH you specified when you started the server. If several matching files are found, a warning is issued. |
| xsltCache | true | If you want to disable caching for the xsl stylesheets you could pass false here. This could be usefull to test your own customizations. |
| authenticationMethod | null | The authentication to be used. Currently either null (attribute not defined) or basic are allowed. Basic means the basic authentication popup window is displayed when trying to access the page the first time on a session. |
| replication.monitor.user.* | null | These have only effect if you specified the authenticationMethod. You use it to define the authenticated users. One attribute per allowed user is needed. The value of the attribute is a comma separated list of roles. Allowed roles are user, initiator, admin. The role user is the lowest, i.e. it is only allowed to perform read operations and set the dispatcher to true/false. Other writing operations such as to delete entries from the callback queues, start a replication or remove slaves are not allowed. The role initiator has implicitly the role user and additionally is allowed to initiate a replication. The role admin is allowed to perform all operations. |
The Monitor has three main pages plus some other pages used to display results and errors. Every page has tooltips shortly describing the item's function.
You get this page per default. For example if you point your browser to http://localhost:9999 you will see this page. This page displays the status of each ongoing replication in a table. It is a monitoring page, that is, control operations can not be performed here. This page refreshes automatically with a frequency which is customizable. On this page you don't see replications which have not been initiated yet.
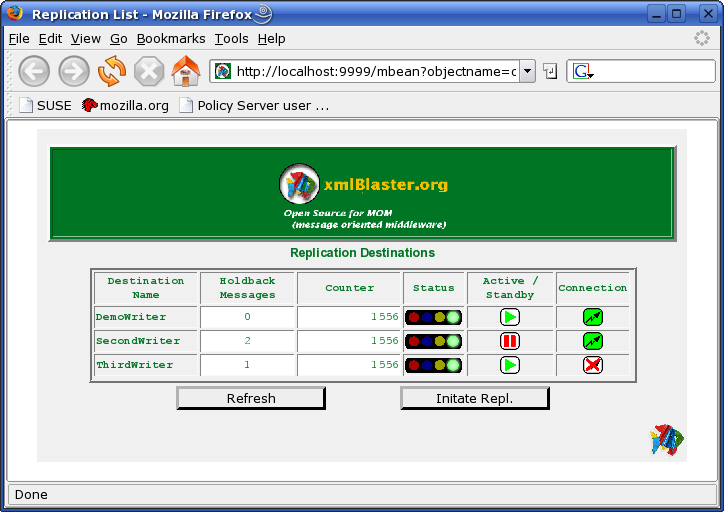
The data is displayed in a table having 6 columns. The first column Destination Name displays the name of the slave associated to that replication. This name is normally either the session name of the slave or a subset of it. This name is customizable. You can click on these names to go to the details of that particular replication.
The Holdback Messages column displays how many entries are still to be delivered. These entries are in the Callback Queue for that client. Under normal operation it should display 0, meaning the holdback queue is empty. There can be three reasons why you have holdback entries:
The server can not contact the slave. This can either be because the connection or/and the slave are down. This can be verified on the column on the left.
The dispatcher delivering the messages from the server side to the client side has been put in standby. This is the case during an initial update as far as the Status is INITIAL (semaphore showing blue). The dispatcher is also put on standby if an exception occurs when writing data in the replica database. This to allow the administrator to repair the error before continuing. The administrator has also the possibility to toggle the state of the dispatcher from active to standby and back.
There are currently many messages to be replicated: more than the slave can handle. This is normally the case during rush hours. It is important that the number of messages in the holdback queue don't grow constantly. If this is the case it means the system is not optimally designed and load balancing or other solutions should be considered.
The Counter column shows the current status of the counter. This is a monoton increasing unique positive integer identifying the message containing the data to be replicated. Be aware of the fact that also internal administrative messages use this counter. This means that in some circumstances there may be entries in the holdback queue which are not containing data to be replicated.
The Status column contains a semaphore having four statuses. One color for each status:
Red is used for the INCONSISTENT. You normally don't see this status. It is the result of an interrupted intial update or if entries have been removed from the callback queue using the administrative console. If you have such a state you need to re-trigger an initial update for that particular replication.
Blue is used for the INITIAL. This is the status indicating that an initial update has been triggered. This will be the status of the replication until all the initial data has been collected and put in the holdback queue. During this phase the dispatcher is in standby mode.
![[Important]](images/important.png)
Important During this phase you are not allowed to activate the dispatcher.
.
![[Note]](images/note.png)
Note During this phase you also see the amount of holdback messages can increase substantially. This is normal since all entries must be queued before starting to replicate.
Yellow is used for the TRANSITION. During the initial update, once all data has been collected on the holdback queue the status switches from blue to yellow. At the same time you can observe that the dispatcher has switched from standby to active. This is the sign that messages are starting to be delivered to the slave, the slave starts to replicate and the amount of holdback messages diminuishes.
Green is used for the NORMAL operation. This is the most common status. It means the initial phase of the replication is accomplished and diffs are replicated on the fly. During this phase, if the dispatcher is in standby or the connection is broken, the entires are hold back. This is not a problem since when the slave is available again, these messages are all delivered in the correct sequence.
The Active / Standby column shows the status of the dispatcher in charge of delivering the messages from the server side to the slave. It has two statuses, either active, meaning the server tries to deliver the messages, and standby meaning it will not deliver even if the connection to the slave is OK.
The Connection column displays the status of the connection. It also has two statuses: either the communication is OK, meaning the slave can be reached from the server, or not OK meaning either that there is a communication problem (for example no route or disconnected ethernet cable), or the slave is not running. Since monitoring is done on the server side there is no way to distinguish among these two cases.
On the bottom of the page there are two buttons. The left button is used to manually refresh this page. The right Initiate Repl. button takes you to the page where you can initiate a new replication.
This page is used to start a replication for the first time. It basically has two display modus which are configurable in the customize.xsl stylesheet. The default is a simple modus which is determined by the parameter:
<xsl:param name="show.cascading" select="'no'"/>
Or for the advanced case:
<xsl:param name="show.cascading" select="'yes'"/>
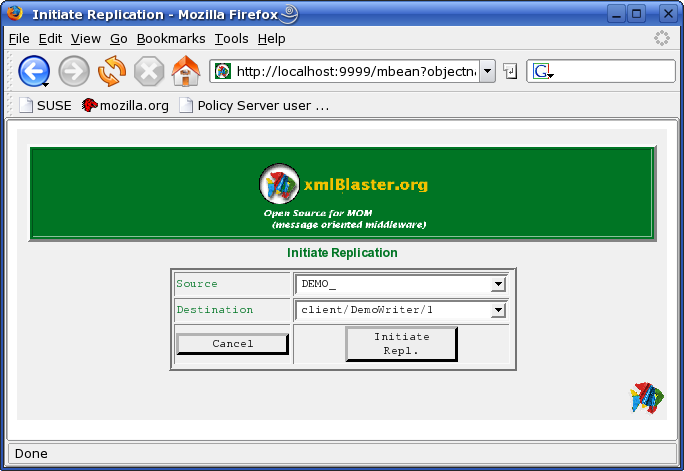
In simple modus there are two multiple choice fields:
The Source field lets you choose which master to use. The Master is identified by the replication.prefix attribute of the DbWatcher acting as master.
The Destination field lets you choose which slave to use. The Slave is identified by the session name of the DbWriter .
As a source you only will see Masters which are registered.
| Note |
|---|---|
When a Master is not accessible, for example in case it is running as a remote application and the connection is temporary broken, it is automatically unregistered. It will be registered again once it will be able to access the XmlBlaster Server again. While unregistered it is not possible to initiate a replication where it is supposed to act as a master. In other words: the master needs to be available at the moment an initial update is triggered. |
As a destination you only will see such DbWriters which have already connected to the XmlBlaster.
| Note |
|---|---|
In contrast to the Master -which needs to be available when initiating a replication- the slave does not need to be available all the time. It suffices that it has connected once to be known (or registered). It will not be unregistered every time the connection is broken. You can start a replication involving a DbWriter even if the connection to this is currently broken. |
Once you have made the choice of a Master and a Slave you can click on the button Initiate Repl. which will start the replication and take you back to the replication list page.
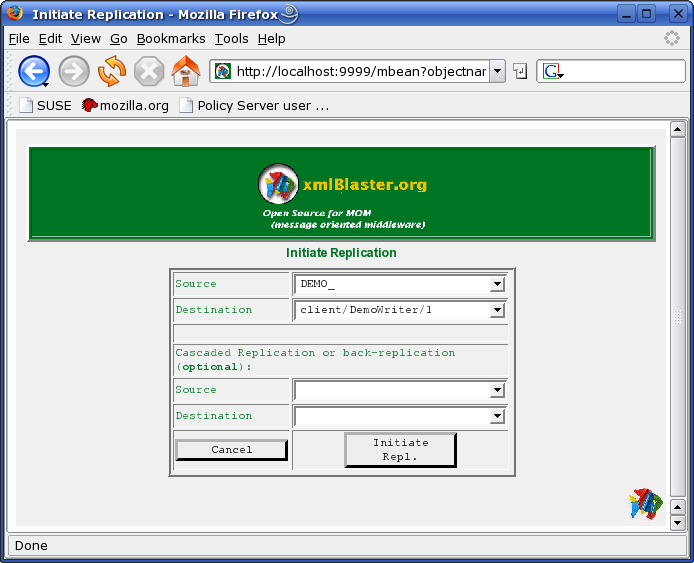
Cascaded modus means you can optionally choose a replication to be automatically initiated once the replication which you trigger now has reached its NORMAL operation status.This can be useful for example for cases where you have a back and forth replication and you don't want to manually trigger the back-replication everytime you want to initiate the replication. If you don't need the cascaded replication leave these fields empty.
| Important |
|---|---|
Once you have made the choice and pushed the Initiate Repl. button the cascaded option is persistently memorized. Subsequently, if you start again the same replication, you don't need to re-specify the cascaded replication: it will be remembered and executed again. |
The Source field lets you choose which master to use. The Master is identified by the replication.prefix attribute of the DbWatcher acting as master.
The Destination field lets you choose which slave to use. The Slave is identified by the session name of the DbWriter .
As a source you only will see Masters which are registered.
| Note |
|---|---|
When a Master is not accessible, for example in case it is running as a remote application and the connection is temporary broken, it is automatically unregistered. It will be registered again once it will be able to access the XmlBlaster Server again. While unregistered it is not possible to initiate a replication where it is supposed to act as a master. In other words: the master needs to be available at the moment an initial update is triggered. |
As a destination you only will see such DbWriters which have already connected to the XmlBlaster.
| Note |
|---|---|
In contrast to the Master -which needs to be available when initiating a replication- the slave does not need to be available all the time. It suffices that it has connected once to be known (or registered). It will not be unregistered every time the connection is broken. You can start a replication involving a DbWriter even if the connection to this is currently broken. |
Once you have made the choice of a Master and a Slave you can click on the button Initiate Repl. which will start the replication and take you back to the replication list page.
If you click on the Cancel button you will be sent back to the replication list page without initiating a replication.
This page shows the details about a single entry. This is not only a monitoring page but also a control page. You can perform several operations on the particular replication.
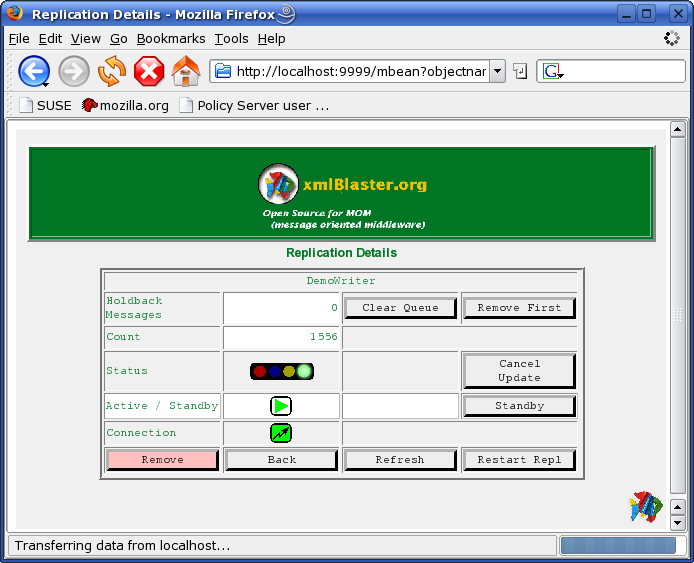
The first column on the left displays the property to monitor/control. The second column from the left displays the current status of that property. This is basically the same information which is also displayed in the replication list page. The rest of the colums display controls used to perform some operations, for example change the status of the property.
Clear Queue This button will clear (remove) all hold back messages. You should use this with care since you will probably get an inconsistent state on the replica after this invocation. Unless you use it to clean up an error, you should re-initiate the replication afterward.
Note The cleaning up of the holdback messages is also automatically done when you intitiate a replication.
Remove First removes the first entry in the holdback queue. This is useful if the last operation produced an error which automatically switched the dispatcher to standby. In such cases, fixing the error on the slave manually, then removing this entry and finally switch the dispatcher to active again will solve the problem and return to normal operations.
Cancel Update is used to stop an ongoing update. This operation is needed if you have previously triggered an initial update which for some reasons did not succeed. This operation will immediately change the status to INCONSISTENT: the semaphore will show red light.
Standby / Activate switches the dispatcher of the holdback messages from active to standby and vice versa. Under normal operations you can safely use this button. Putting it in standby will temporary block the replication for the specific slave.
Important You shall not use this button while not under normal operations.
Remove removes a replication permanently. You normally don't use this feature unless you want to remove forever a certain replication.
Back takes you back to the replication list page.
Refresh manually refreshes this page. This is normally not necessary since the page refreshes automatically.
Restart Repl is used if you want to restart a replication. It remembers the values configured the first time you started the replication for the first time. This has the same effect as going to the Initial Update Page and trigger a replication with the same source and the same destination.
Note Note that the optional cascaded values can be overwritten, i.e. the cascaded replication can be changed but can not be removed.